A Glorious Grasshopper

The cheerful chirping of grasshoppers on a warm sunny day has been described as the sound of Summer. One species that you are most likely to hear, and see, is the Field Grasshopper, Chorthippus brunneus.

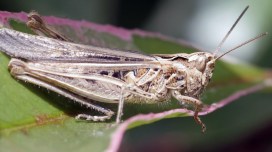
Grasshoppers and their relatives the crickets belong to the insect Order called the Orthoptera. Grasshoppers have short antennae and crickets have antennae which are typically longer than their body. The Field Grasshopper is a common insect and is found throughout the UK. It is well-camouflaged. Its striped brownish colour often matches the grasses among which it lives. The species displays many colour variations, helping it to remain concealed, so you will often hear it before you see it.

Field Grasshopper, Chorthippus brunneus. Image credit: S Rae CC BY 2.0

Like other grasshoppers, their chirping call isn’t produced by its mouth but by rubbing its back legs against its forewings to make a sound. This is called stridulation. It is the males that make this sound in an effort to attract females. Entomologists often use these sounds to tell different species apart. The ‘song’ of the Field Grasshopper is a series of short ‘chirps’ repeated at intervals. You can listen to it on the orthoptera.org.uk website.

Chorthippus parallelus (top) has straight keels, C. brunneus (bottom) has indented keels (arrow). Image credit: OUMNH

There are a couple of other ways to identify the Field Grasshopper:

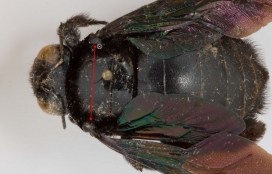
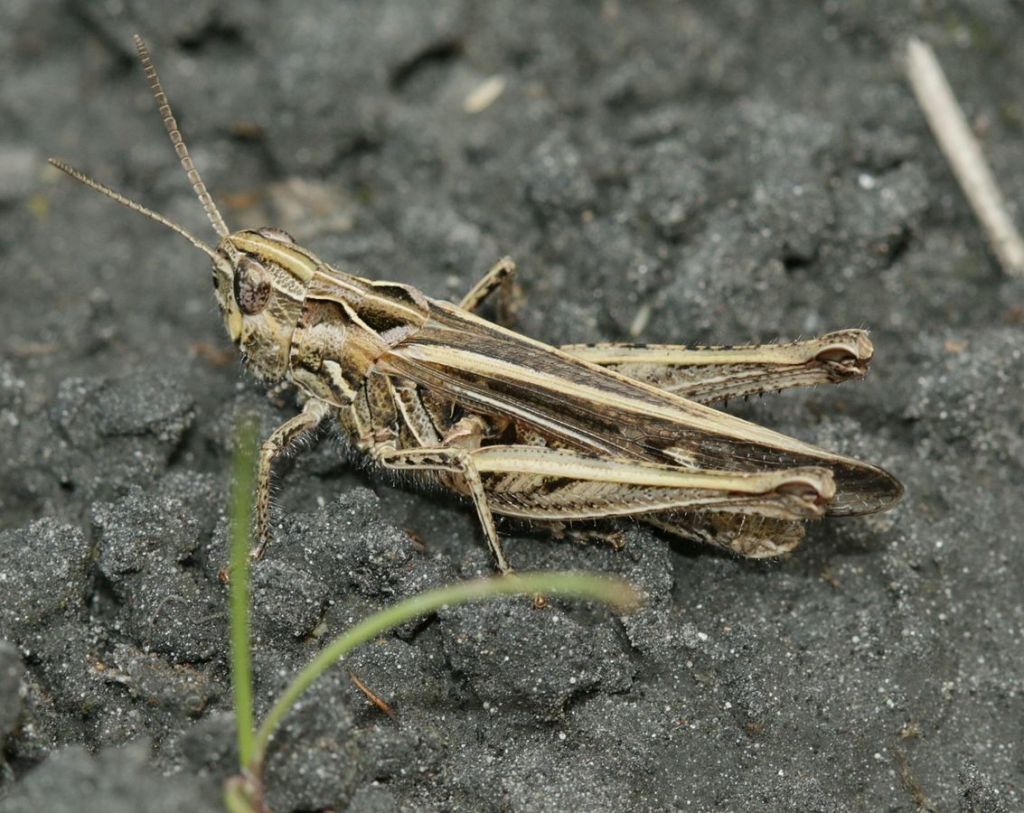
  • As you can see in the picture above, the ridges (called keels) at the sides of the saddle-shaped structure just behind the head (called the pronotum) curve inwards sharply in the Field Grasshopper (red arrow). In the similar-looking Meadow Grasshopper (Chorthippus parallelus), the keels are not indented.
  • Look at the underside of the grasshopper (if you can catch one!) . In the Field Grasshopper), it looks very hairy. In other similar species it looks smooth.

As their name suggests, Field Grasshoppers can be found in grassland in the countryside and in gardens. They feed on the grasses on which they live. The juvenile grasshoppers start hatching at the end of March. They grow through a series of stages, called instars, with the first adults appearing in June. They live throughout the summer and into late autumn. The females lay eggs in the soil which overwinter, hatching the following spring.

There is still plenty of time this year to spot field grasshoppers so why not have a look in a grassy area near you? We’d love to see any photos you take! If you likes this article, you might also enjoy watching this video about Field Crickets by Professor Karim Vahed.

Help Save Bees With The Big Bee Bonanza!

Measure beautiful bees from around the world to help biologists understand why bee species are declining.

The Big Bee Bonanza is a new citizen science project investigating the size of bees held in university and museum collections. Scientists want you to help measure bees using a simple online tool which will add your data to the project. The results will be useful both to bee conservation biologists and everyone interested in nature. Researchers will use these data to help understand why bees are declining. You get to see beautiful bees from around the world and help us save the bees at the same time!

You can join in by following this link: https://www.zooniverse.org/projects/md68135/notes-from-nature-big-bee-bonanza/classify

Once you are on the site, we think it’s a good idea to watch the tutorial video first. You can do this by clicking on the ‘Field Guide’ tab (shown above). A video will then slide out from the left of the screen. When you are happy you know what to do, click the ‘Field Guide’ tab again to close the video. You can start measuring bees.

There are two steps. First measure part of the scale bar, to tell the computer the size of the image, then measure the distance between the tegulae at the base of the bee’s wings. Tegulae are structures that protect the wing where it joins onto the body.

We hope you have fun measuring bees. You can measure as few or as many as you like; it all provides useful data for bee researchers. If you’re interested in bees, you might want to take a look at our post on queen bees.

Insect Investigators 2022

By Yiwen Chen

2022’s ‘Insect Investigators’ Summer School’, organised by ‘Hope for the Future’ Project, has been a wonderful experience for me. Not only was I able to learn new facts and skills, I also took my interest in insects to the next level. I also met new people and made new friends!

Catching insects

One of my favourite activities was catching insects. We tried this at different places (like the Oxford University Park and Harcourt Arboretum)
and on different days. We were given a large sweeping net, a transparent bag, a tray, and some tubes with lids to contain the insects. The sweeping net was used in the long grass. You sweep in loops, making infinity signs whilst walking through the field. Then, a friend could help you to empty the things caught inside the net into the transparent bag. You then place it upon the tray and see what you have caught. If you want to examine it closer or if you find it unique and interesting, you can gently put the insect into one of the tubes and then use the many insect guide books (brought from the museum) to identify them.

I always felt excitement growing when looking at what I had swept up in the net. I was not only able to learn this new skill, I have also learnt about the many insects I came across: there are larvae which have three pairs of ‘real legs’ and little bags of fat for the rest; grasshoppers drop their legs sometimes to divert their predator’s attention when being hunted (the legs won’t be able to grow back if they are adults); and a wasp nest contains all sorts of hidden treasures like beetles and their larvae.

Photography

It was an absolute delight to go to the Oxford Botanic Gardens on our second day. Even more so to learn about taking photos of various insects.
Insects are small creatures, hard to spot, even harder when amongst the enchanting plants and beautiful flowers. But we were told where to look: upon the bitten leaf, beside the blooming flower, within the fallen apple… There, we find the angle, adjust the focus, and carefully, snap!

A black ant tending to a line of green aphids along the vein of a leaf they are feeding on.
Ant ‘farming’ aphids. Image: OUMNH / Yiwen Chen


As we took photos, I was able to learn more about the insects I’d found. For example, on one of the leaves of a tree, I found an ant upon a group of small insects. I later found out that the black ant was eating the sweet sap that aphids (small sap-sucking insects) produce from the tree. The ant then protects the aphids in exchange. It was very interesting. There were also many bees including honeybees and bumblebees that were all busy feeding off the nectar and pollen. This meant that they did not mind us so I was able to snap many good pictures of them. There was a Seven-Spot Ladybird on the smallest leaf of a plant, a few Flea Beetles beside some small flowers, and a Hoverfly resting on a leaf. I even saw a Red-Eyed Damselfly upon a lilypad.

It was stunning to see the beauty of nature around us, and to search for the hidden ones like detectives trailing clues. Photography allows me to capture the special moment and I also love it as a hobby.

Investigation

Near the end of the week, we were able to put everything we know together to create an investigation. I chose to compare the number of
grasshoppers in two different places— fresher grass and dry grass. My prediction was that there would be more grasshoppers in fresher grass than in dry grass. To make it a fair test, I used the same net, I always made 5 loops/infinity signs when sweeping, and I was always 5 steps in the grass when catching insects.

Pencil sketch of a grasshopper by Yiwen Chen.

I was very happy when my results showed that my prediction was correct, My conclusion was that there were more grasshoppers in fresher grass than in dry grass which may be because of five things. First, grasshoppers eat grass and would naturally prefer fresher grass over dry grass. Second, grasshoppers lay their eggs beneath the grass in the soil. Dry grass usually means more exposed to the sun, which means hard and crusty soil— hard to burrow through. Third, some species of grasshoppers are green so they could camouflage better in the fresher, greener grass to escape predators. Next, fresher grass means better conditions, which means a variety of different plants that could provide for them. And last, more plants and fresher grass could also attract other insects. This could either divert their predators’ attention, or work together like the aphids and ants. This was a great way to put everything we’ve learnt together. I’ve enjoyed it very much.

Hope for the Future

As I’ve said before, insects are small creatures, but they are able to make great changes to the world. Looking back and seeing all these little
creatures continuing on with their daily routines, it reminds me of their similarity with us— humans. For we are also creatures very much like them, except we have evolved and created trouble (like climate change and global warming) as well as solutions. Although this brings some sadness into me, I am also filled with hope. My hope for the future is for all humans to be brought together to face problems and to tackle them. Just like the aphids and the ants, we can help each other out. In a way, part of our future relies on insects, so we should spend our time wisely to look at them and see them for what they can do, and achieve. I believe that this ‘Hope for the Future’ Project has done an amazing job to make everything run smoothly, as well as making me enjoy every second of it! They have given me this chance to explore and learn, and I hope to take part in more of their programme!

The next event for young entomologists is ‘Entohunt’ on Wednesday 31 August 2022, 10am-12pm at the Museum. It’s free but you need to book a place in advance.

Email us at hopelearning@oum.ox.ac.uk to book a place.

Entohunt: Investigating insect biodiversity

Honey bee feeding on nectar

Our next event for young entomologists, aged 10-14, will be ‘Entohunt’ on 31 August 2022, 10am – 12pm at the Museum of Natural History in Oxford.

Entohunt is your chance to take a closer look at the wonderful world of insects on our doorstep. We’ll start by making pooters in the museum and then, weather permitting, test them out in University Parks and see what insects we can find. There will also be a chance to try out other entomological collection methods.

This event is free but booking is essential. Email us at hopelearning@oum.ox.ac.uk to book a place.

Delightful Damselflies

One of the delights of summer is seeing slender bright blue damselflies flying near water. One of the most beautiful is the Azure damselfly, Coenagrion puella.

Dragonflies and damselflies make up the order of insects called the Odonata. Damselflies are members of in the sub-order Zygoptera, meaning “paired-wings”. Dragonflies are in the sub-order Anisoptera, meaning “unequal wings”.

You can tell the difference between damselflies and dragonflies because, in general, the body of damselflies is more slender and delicate compared to that of dragonflies. Damselfly eyes are separated on either side of the head, but dragonfly eyes are often so large they may touch. The forewings and hind wings of damselflies are the same shape, whereas the hindwings of dragonflies are broader than the forewings. Damselflies also tend to close their wings along their body when at rest but dragonflies hold their wings open. Damselflies are not as strong fliers than dragonflies and so may spend more time resting.

Newly-emerged adults are called ‘Tenerals’. They can appear very pale and may not have their mature colouration yet. You may have to look closely for any emerging markings or patterns to help identify it. Very mature adult damselflies can appear much darker.

The Azure Damselfly, Coenagrion puella, is found throughout England and Wales and in Southern Scotland near water, including garden ponds, in which the larvae develop. There is no pupa, instead, the adult develops inside the final larval stage and emerges directly from it. Adults fly between April and September, usually near water. They are about 3cm long and, as their name suggests, the males are banded with blue stripes on their black body, although the females are usually a bright green and black.

The male colouration looks similar to several other blue damselflies but can be distinguished by the pattern, especially on the second abdominal segment. You’ll have to look closely! Try taking a photo and zooming in.

Banding patterns in some similar blue damselflies

(a) C. puella has a U-shaped black mark on the upper side of this segment.

(b) In the Variable Damselfly, Coenagrion pulchellum, this ‘U’ has a ‘stem’ making it look more like a wine glass.

(c) The Common Blue Damselfly, Enallagma cyathigerum, has a marking shaped like the ‘spade’ on playing cards.

(d) In the Northern Damselfly, Coenagrion hastulatum, which is found in Northern Scotland, the ‘spade’ shape looks more like an arrow head.

(e) The mark on the Southern Damselfly,  Coenagrion mercuriale, found in Southern and South-western England and Wales, has ‘arms’ and is sometimes said to resemble a ballet dancer.

Have you seen an Azure Damselfly, or any other type? We would love to hear about it or see your pictures, of these or any other insects. You can get in touch using our Contact Us page.

If you enjoyed reading about these insects, you might like to try making your own dragonfly glider.

Make your own flying insect!

We’re all impressed by insect aerobatics and now you can make your own flying insect model. Here’s how to make a model glider: choose from butterfly or dragonfly, or maybe make both!

What you will need

  • thin card
  • scissors
  • glue stick or paper glue
  • colouring pens or pencils
  • plasticine or blu-tak
  • a print-out of this insect glider template:

How to make your glider

  1. First download and print out the insect template sheet. If you can print onto card, you can skip step 2. If you don’t have a printer you could trace the outline of one of the insects from the screen.
  1. Choose an insect picture and stick it onto a piece of thin card. The type that cereal boxes are made out of will work well.
  1. Colour in your insect. You could make it look like a real species of butterfly or dragonfly, or you could let your imagination run wild!
  1. Cut round the outline of your insect.
  1. Cut out the grip from the paper template. This is the bit you hold when you throw your glider. Fold it and stick it to the underside of your insect as shown.
  1. Lastly, you will need to weight your insect so it flies properly. If you’re making the dragonfly, put a blob of plascicine or blu-tak at the front. For the butterfly, it will fly better if you put a blob at the front tip of each wing. You might need to experiment a bit to find out how much weight you need to add for the best flight.

Your insect glider should now be ready to go! Have fun flying it. You might want to see how far it can go, how long it can stay in the air, or which of the two models flies best. We’d love to hear how you get on and see your insect designs. You can get in touch using the Contact Us page.

If you enjoyed this make, why not try out some of the others on the Make & Do page?